The surface of your favorite vinyl plays a softer melody when everything behind the scenes is spotless. Many collectors realize bearing shaft cleaning matters only after an unpleasant noise, slow rotation, or unexpected skip creeps in during playback. A little bit of maintenance goes a long way for any turntable—and can save irreplaceable records from unnecessary wear.
Routine cleaning and care don’t just improve sound. They extend the lifespan of your gear and keep your music sessions frustration free. Proper bearing shaft cleaning reduces resistance, preserves delicate components, and prevents damage caused by dust or dried lubricants. All it takes is a focus on detail and some reliable habits.
If you’ve wondered how small habits preserve your vinyl treasures, read on. This guide covers essential steps, practical checklists, and actionable tips for bearing shaft cleaning in vinyl record players. Let’s make sure every spin sounds just as you intended.
Spotting and Preventing Build-Up: Recognizing When to Clean the Bearing Shaft
Clear warning signs prompt timely cleaning, which delivers immediate improvements in playback and sound quality. Look for sluggish platter movement and audible scratching as cues to act.
Common buildup occurs when dust and old oil combine, creating a sticky residue around the bearing shaft. This mess prevents smooth rotation, affecting both pitch and consistency in music playback.
Visual Cues: What to Watch For Before Cleaning
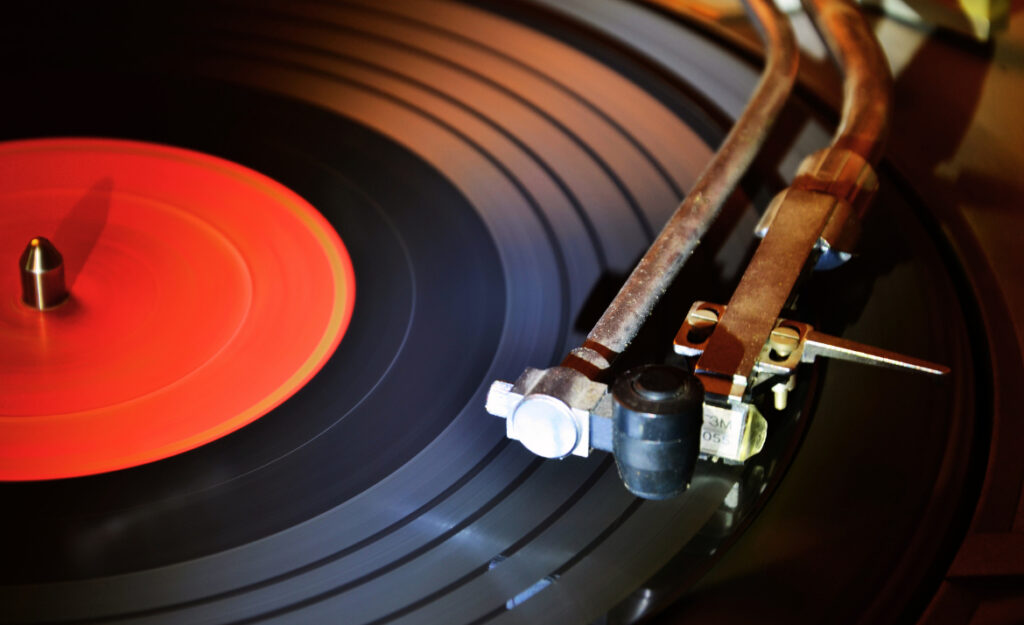
Shine a flashlight across the bearing shaft while slowly rotating the platter. You’re looking for dull spots, streaks, or fine dust layering the metal—each signals cleaning is due.
Close inspection under strong light reveals if edges appear sticky or have an unusual texture compared to the surrounding metal. These changes indicate dry lubricant or contaminants building up.
Listen for subtle grinding or feel for drag when spinning the platter by hand. These sensations, paired with visual cues, validate the need for immediate bearing shaft cleaning.
Troubleshooting Playback: Linking Symptoms to Shaft Cleanliness
If your records suddenly lose clarity or develop more noise, check the bearing area. Friction from grime translates directly to distorted sound and erratic speeds. Messy shafts make delicate styluses struggle.
Wobbly platters are another overlooked sign. Greasy or unbalanced debris on the bearing shaft throws off the alignment, so vibrations transfer to the record and muddle playback.
Nicks or scratches visible on the spindle also signal worn bearings. Improper cleaning or neglect leads to these permanent blemishes, leaving records at risk without timely attention.
| Indicator | What to Look For | Impact on Sound | Recommended Action |
|---|---|---|---|
| Dull Metal Surface | Lack of shine, sticky residue | Muffled, inconsistent sound | Clean shaft, reapply lubricant |
| Visible Dust Build-Up | Clumps or streaks near base | Unstable rotation, occasional skips | Gently wipe with microfiber |
| Noise During Playback | Grinding or scratching sounds | Loss of clarity, record damage | Inspect, clean thoroughly |
| Spacing Irregularities | Wobbly platter, uneven movement | Pitch fluctuation, tracking errors | Check shaft alignment, clean |
| Dry Lubricant | White or waxy residue on shaft | Increased friction, slow starts | Remove residue before lubricating |
Gathering Tools and Solutions: Preparing for a Safe, Effective Clean
The right supplies make bearing shaft cleaning safe and straightforward. Equip yourself with appropriate tools to protect your turntable’s delicate mechanics and finish.
Keep dedicated cleaning materials in a small tray or box near your setup, so you can reach for them without delay anytime subtle changes in sound or feel arise.
Essential Supplies List
A successful bearing shaft cleaning session relies on just a handful of carefully chosen tools and fluids. Knowing exactly what to use keeps you from risking accidental scratches or residue build-up on sensitive surfaces.
- Use a lint-free microfiber cloth to sweep away debris without leaving fibers behind. Excess lint can interfere with lubrication later.
- Choose isopropyl alcohol (at least 90 percent) for breaking down sticky old oils and grime, ensuring thorough removal with no smearing.
- Apply purpose-made turntable oil or bearing lubricant, never household greases. Specialized formulas maintain performance—using the wrong product attracts dust or creates gumming.
- Keep wooden cotton swabs handy to reach tight corners between the shaft and base where fingers can’t go.
- A soft, precision brush, like those used for camera lenses, helps dislodge fine particles that hide in grooves or seams around the bearing shaft.
Store all items together, so you won’t have to hunt when it’s time for regular maintenance. Clean tools after every use to prevent cross-contamination.
Choosing the Right Cleaning Fluid for the Job
Isopropyl alcohol cleans away stubborn grime, but use minimally to avoid seepage into internal mechanisms. Apply with a dampened swab, never directly onto surfaces.
- Always choose high-grade, residue-free isopropyl alcohol. It evaporates fast, leaving no slick behind that could mix poorly with new lubricant.
- Do not substitute water or diluted household cleaners, which can corrode metal or promote internal rust. Stick with verified, purpose-specific fluids for lasting results.
- If your turntable model has a unique finish or coating, check the manual for fluid recommendations. Many manufacturers list compatible products to help you avoid damaging decorative finishes around the bearing.
- Test a tiny, hidden patch of metal before cleaning the entire shaft, verifying no pitting or color change occurs. This quick step prevents irreversible cosmetic or functional flaws.
- Use a fresh cloth or swab for each cleaning session. Reusing supplies drags old grime across the surface, sabotaging all your work.
With the right supplies ready, bearing shaft cleaning protects your turntable and ensures the purest playback possible.
Building a Proven Cleaning Routine: Step-by-Step Maintenance for Turntable Longevity
Consistent routines give predictable, high-quality results. Follow these exact sequences to prevent accidental missed steps and maximize the life of your vinyl records and gear.
When you teach yourself a fixed ritual, it becomes second nature, like brushing your teeth before bed—only this time, it’s for your precious sounds.
Disassembly with Care: Accessing the Bearing Shaft Safely
Start by powering off and unplugging the turntable, preventing shocks or accidental starts. Remove the platter slowly, noting how each piece sits for easy reassembly later.
Keep every screw, washer, and bearing in order on a tray so nothing rolls away or gets lost. Lay out parts in left-to-right order of removal; snap a phone photo as a backup.
Resist the urge to rush. A calm routine reduces accidental knocks and preserves the factory fit of each component, setting you up for a smooth re-fit after cleaning.
Thorough Yet Gentle Cleaning: Removing Old Lubricant and Residue
Dab a lint-free cloth or cotton swab in isopropyl alcohol. Carefully wipe all exposed surfaces of the shaft and inner bearing well. Light, controlled strokes ensure an even clean.
As you work, check the cloth for dark or yellow stains—these mark areas of heavy old oil or debris needing extra attention. Repeat until clean and residue has transferred off.
Allow components to air dry in a dust-free spot for several minutes. Patience here prevents smears or trapped moisture when you later lubricate and reassemble the system.
Table: Bearing Shaft Maintenance at a Glance
| Task | Frequency | What You’ll Need | Key Tip |
|---|---|---|---|
| Visual Inspection | Monthly | Flashlight, magnifier | Look for corrosion or debris |
| Cleaning | Every 3–6 months | Microfiber cloth, isopropyl alcohol | Work gently in small circles |
| Lubricating | Every 6 months | Turntable oil, applicator | Add one drop then spin by hand |
| Reassembly | After each clean | Photo reference, clean tray | Double-check part alignment |
| Performance Test | Post-maintenance | Reference record, headphones | Listen for smooth, quiet spin |
Restoring Performance: Lubrication and Final Checks that Safeguard Your Records
Careful lubrication after bearing shaft cleaning ensures silent, frictionless playback. The specific order of this process preserves the life and shine of your entire turntable system.
Missteps here can create problems worse than before—so follow this sequence and use only condition-checked lubricants each time you finish a cleaning round.
Applying the Right Lubricant in the Right Spot
Dab a tiny drop of manufacturer-recommended turntable oil on the cleaned shaft tip. Too much attracts dust, so less is truly more in this task.
Slowly rotate the platter by hand a few turns to evenly distribute the lubricant across all bearing contact points. You’ll feel movement become silkier with each turn.
Wipe away any visible extra oil from exposed surfaces using a clean side of your microfiber cloth. Precision here prevents run-off that might mix with your next round of dust.
- Apply oil using a syringe applicator for pinpoint accuracy; this prevents accidental splashes that could reach the platter and records.
- Rotate the platter counterclockwise after lubricating. This pulls oil efficiently through internal curves and grooves on traditional turntable bearings.
- If reassembly feels tight or something doesn’t fit smoothly, pause and double-check the bearing’s orientation. Never force pieces, as micro-damage can sabotage future sounds.
- Finish with a gentle movement test. Spin the platter at least five rotations by hand, confirming silent, steady movement from start to finish.
- Let the turntable rest for at least fifteen minutes before playback, ensuring all parts have fully settled and excess lubricant has drained away.
Poor lubrication technique can turn quick fixes into headaches, so take the same care as a chef plating a signature dessert—precise, tidy, and deliberate.
Updating Your Routine: Proactive Maintenance Habits That Extend Turntable Life
Routines work when you keep them simple and memorable. Integrate bearing shaft cleaning into your weekly or monthly habits, just like dusting your shelves or washing your hands after a messy job.
Pair maintenance chores with listening rituals—set aside one side of your favorite LP as your “check-in point” before you start a session.
Checklist for Long-Term Results
Jot down each step on a sticky note or in your phone. Visual reminders boost consistency. Follow the checklist below, and add your own steps as you experiment:
- Inspect the shaft and platter before each use, noting changes in feel, sound, or visual debris. Adjust frequency depending on how much you play records.
- Wipe visible dust from the record area and turntable’s exterior using a microfiber cloth before every session, keeping particles away from sensitive internal parts.
- Clean the shaft using isopropyl alcohol every three to six months; increase the interval if you notice more grime or play your collection daily.
- Lubricate as soon as movement feels stiff or sound loses clarity, never putting it off—delays encourage permanent wear and tear.
- Test performance with a favorite reference record and good headphones after every full maintenance session, confirming smooth, quiet spins before playing prized vinyl.
When routines are short and simple, you’ll actually do them—rewarding yourself with better sound and longer-lasting gear in every session.
Small Habits, Big Impact: Proven Stories and Lessons from Real-Life Vinyl Setups
Every collector has a story where neglecting a tiny detail leads to a big, unexpected expense or disappointment. Proactive bearing shaft cleaning is the best insurance for those stories never repeating.
Imagine a friend finding their cherished record warped from a platter spinning out of balance. Every time, the cause traces back to neglect—not a design flaw, but missed cleaning routines. Proper habits turn stories from regret to pride.
Real-World Mini-Scenarios
Jon noticed a click each time his LP spun: he paused, checked underneath, and discovered debris wedged by the bearing shaft. Cleaning restored quiet playback instantly—lesson learned.
When Maya’s new audiophile turntable began to sound flat, she remembered her maintenance notes. A quick check revealed dry lubricant on the shaft, and after careful cleaning, warm tones returned.
Dustin, who rarely checked his turntable’s underside, dealt with skipping records until a tip from a friend prompted a deep clean. The improvement sparked a new monthly routine—and less frustration.
Analogies for Better Maintenance
Caring for your turntable’s bearing shaft is like changing oil in a car: running dry accelerates wear, but clean, fresh oil keeps everything moving smoothly for years.
Skipping bearing shaft cleaning is like never dusting your glasses. You don’t notice the impact right away, but clarity returns immediately after a quick swipe—and your listening experience is transformed.
Imagine hosting a dinner party with dull cutlery; no matter the meal’s flavor, neglected tools hinder enjoyment. Keeping the shaft spotless honors every detail of your records’ sound.
Carrying Your Vinyl Collection Forward: Why Maintenance Makes Memories Last
Embracing simple, routine bearing shaft cleaning preserves more than just machine parts. Each spotless spin means your rarest records remain pristine with each listen, letting timeless music feel brand new year after year.
Commitment to regular checks honors the care that went into pressing every groove and gives back to your future self with uninterrupted, high-fidelity sound. Maintenance isn’t a chore—it’s a reward built into every session.
Small habits add up: by integrating these steps, you protect the magic of music itself. Your favorite records, heard in their full glory, thank you every time the needle drops.