There’s nothing like holding a record under a lamp and noticing surface swirls you never saw before. That moment changes how you approach your collection. While it might seem trivial, using vinyl inspection lighting exposes flaws invisible under standard room light.
You care about getting the best out of every record. Scratches, dust, and residues can affect play quality and even damage your turntable over time. The right inspection lighting reveals issues that cleaning alone won’t catch.
This article unpacks what makes vinyl inspection lighting essential for collectors and listeners. Explore practical setups, smart techniques, and real-world examples to ensure your records sound as clean as they look.
Choose the Best Lighting for Viewing Surface Imperfections Now
Choosing the right vinyl inspection lighting setup lets you immediately spot dust, scratches, or pressing flaws. Using a targeted light source makes imperfections pop, improving cleaning and playback.
For maximum detail, prefer adjustable lighting that mimics daylight or uses high-CRI LEDs. This lets you compare vinyl under identical conditions each time you examine a new acquisition.
Why Direct Light Is Better Than Ambient Room Lamps
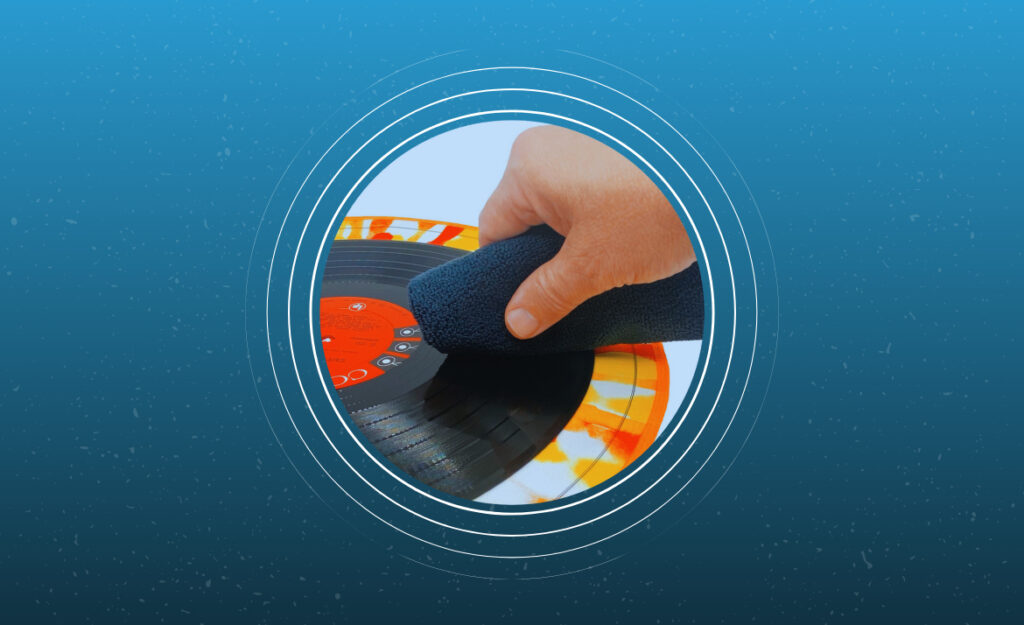
When you hold a record over a desk lamp, the sharp reflection highlights every groove and speck of dust. Ambient lighting in a room, by contrast, scatters light and hides subtle surface defects.
Set your lamp at a low angle, aiming across the record surface, and slowly rotate your vinyl. Small nicks and hairline scratches will reveal themselves as bright streaks or shadows.
An adjustable gooseneck lamp works well. Position it at different heights to compare old pressings with new ones. This habit makes cleaning far more targeted and effective.
Mimic Sunlight for True Color and Clarity
High-CRI (Color Rendering Index) bulbs capture the real color of vinyl and jackets. If your space lacks natural sunlight, opt for LED lamps labeled CRI 90 or higher.
This level of clarity lets you distinguish between dust, fingerprints, or the faint oily film left from inner sleeves. Sunlight analog lighting reveals genuine scuffs versus discoloration, saving you expensive cleaning supplies.
The next time you buy used records, bring a pocket LED inspection light. Use it to gauge surface condition before purchase and avoid surprises at home.
| Light Type | Typical CRI | Advantages | Action to Take |
|---|---|---|---|
| Incandescent Bulb | 95+ | Warm color, excellent defect visibility | Use for close work, but monitor heat output |
| Cool White LED | 80-95 | Energy efficient, close to daylight | Position near record for glare-free inspection |
| Halogen Desk Lamp | 95+ | Sharp detail, easy to find bulbs | Set at 30-45 degree angle for best results |
| Sunlight Window | 100 | Perfect color, no cost | Check surface on clear days; avoid direct midday sun |
| Ring Light LED | 90-95 | Even, shadowless visibility | Hold over the spindle for uninterrupted inspection |
Set Up a Faultless Vinyl Inspection Station Using Simple Supplies
Creating a practical vinyl inspection lighting station takes just a few everyday items and some strategic placement. You’ll notice surface changes and residues that casual setups miss.
Start with a clean, flat workspace. Good lighting makes every future cleaning and playback step more precise, even if your collection is small.
Secure and Position Your Record for Stability
A record lying flat on a microfiber mat prevents rolling, keeping both hands free for inspection and cleaning. It also stops static buildup that attracts dust during handling.
- Select a lint-free mat: Reduces transferred fibers, helping you spot real defects instead of stray dust.
- Use rubber or cork: Cushioning absorbs minor pressure, so records stay level and undamaged during rotation.
- Avoid hard surfaces: Scratched tables can generate dust, making real flaws hard to distinguish. Consider a portable workspace for maximum cleanliness.
- Wipe before placing: A quick swipe with a dry cloth removes particles invisible under ambient light. Make this a habit when rotating multiple albums.
- Angle slightly: Propping one side up with a coaster helps when checking edge warps and wear rings under direct light.
Combining these tweaks guarantees better inspection every time you use your lighting station. They become second nature after a few handling sessions.
Arrange Your Inspection Lights for Maximum Contrast
Set at least one lamp a few inches from the surface, aiming across the grooves. You don’t want glare, so tilt the bulb until reflections highlight micro-abrasions.
- Start with one direct lamp: Adding more lights can mask surface texture with overlapping shadows. Let one bright light show contrast before bringing in fill lighting.
- Test with record sleeves: Slip a printed sleeve under a clear record to see if color distortion changes with lighting types. This checks for true daylight balance.
- Rotate both the record and light: Watch as movement emphasizes hairline flaws at certain angles but they vanish at others. It trains your eye for quick assessments.
- Dim the room: Block all other lamps and windows except your inspection light. This isolates imperfections and improves accuracy.
- Switch bulbs occasionally: Compare LEDs and halogens to ensure you’re seeing every surface mark in its truest color and depth.
Fine-tuning lighting angles and sources prepares your records for any post-inspection cleaning or grading steps without any guesswork.
See Surface Contamination and Scratches Before Cleaning Starts
Examining vinyl with proper inspection lighting reveals everything: pet hair nestled in grooves, tiny scratches near the center labels, and residue rings from old sleeves. These subtle imperfections signal which cleaning method to use first.
A poorly lit workspace hides crosshatch scratches, making it easy to miss issues that sabotage your sound system. Lighting transforms the inspection step into a reliable part of your cleaning routine.
Use Lighting to Target Deep Cleaning Efforts
Shining a focused LED light lets you spot stuck dust tracked into the runout. Instead of guessing where to scrub, you can target exactly those stubborn spots and save time per record.
When collectors say, “The last time I missed a fingerprint, my stylus skipped,” they’re sharing a lesson. Good inspection lighting prevents costly mistakes. Practice this on your oldest records first.
Pairing a directional light with a magnifying lens exposes pressing artifacts or mold spots that basic cleaning misses. Every inspection becomes a quality-control checkpoint for your whole collection.
Distinguish Permanent Damage from Fixable Flaws
Lighting that mimics sunlight separates permanent scratches from light smudges you can wipe away. If a mark disappears after tilting the record, you know it’s a surface speck, not a groove defect.
Crouching at record fairs, collectors use pocket LEDs to check for groove wear. Practicing at home with your setup makes these moments instinctive. Equip yourself to spot long scratches before they impact playback.
Mark removable flaws as “cleanable” and permanent ones as “play-grade relevant.” This keeps your grading honest and your records sounding their best every time you play them.
Create an Efficient Record Grading Routine with Lighting Techniques
Efficiently grading your records isn’t just about assigning a value. With vinyl inspection lighting, you can develop a repeatable process that highlights the most collectible and playable records in your library.
Sequence Lighting Steps for Grading
Lay out a sequence: (1) Wipe dust under ambient light. (2) Inspect edges under angled lamp. (3) Examine grooved area with direct LED. (4) Mark flaws with sticky note. Repeat for each record side.
Record graders swear by this repeatable pattern. A checklist on your desk helps you create consistency and makes grading feel less overwhelming, even with large hauls or swaps.
Assign grades only after lighting checks. Many overgrade by relying on feel or past owner reputation alone. Commit to a lighting-first approach to keep your appraisal honest and transparent.
Evaluate Records for Sale or Trade Using Lighting
At record stores or when trading with friends, visible condition is everything. Using a flashlight, say aloud: “I’m looking for spindle marks, not just surface shine.” This builds trust during deals.
Lighting helps you distinguish cleaning-related marks from pressing errors. Hold the record near the lamp and point out flaws. “There’s a scuff here, but groove looks intact.” Transparent grading keeps everyone happy.
When prepping to sell online, take photos under your inspection lighting. Clear, honest images reduce returns and establish your reputation as a seller who overdelivers on transparency.
Compare and Contrast Cleaning Results with Strategic Lighting Choices
Strategic use of vinyl inspection lighting reveals whether cleaning has truly improved your records. Rapidly alternating light sources or angles exposes residues missed by brushes or sprays.
| Before Cleaning | After Dry Brush | After Wet Clean | Lighting Takeaway |
|---|---|---|---|
| Visible dust, oily handprint, one fingerprint | Most dust gone, fingerprint remains, smudge visible | Surface shines, only faint swirl lines left | Use handheld LED at low angle for last check |
| Center label haze | Label clearer, edge ring stubborn | No visible residue, colors restored | Test label under cool white LED for clarity |
| Random white specks | Majority removed, three new specks appear | Specks gone, small static line noticed | Dim room, check for static with felt mat |
| Sticky residue on grooves | Less visible, but not gone | Residue faint, but present at angle | Switch between angled and overhead lamps |
| Surface dullness | Dullness patches remain | Overall gloss returns, grain still visible | Add halogen spot to confirm full gloss |
Using side-by-side lighting comparisons, you can confidently refine your cleaning routine for better audio enjoyment each time.
Prioritize Tool Safety and Comfort to Prevent Vinyl Damage
Safe lighting setups protect your records and make the inspection process quick and repeatable. One wrong move with a heavy lamp or a hot bulb can crack or warp precious vinyl. Use comfort and safety as your guide.
- Choose cool-running LEDs for long sessions to prevent accidental heat damage on stationary records.
- Position lamps securely using weighted bases or clamps, especially on cluttered desks, to avoid slips onto delicate records.
- Wear lint-free gloves during inspection for a better grip and to prevent new fingerprints under bright light.
- Keep cleaning solutions and liquids far from your lighting cords to eliminate hazards that could short out bulbs or stain jackets.
- Rest your eyes every 20 minutes by looking at a far object or briefly dimming the inspection light to reduce strain during marathon cleaning sessions.
A safe, comfortable workspace encourages more frequent, thorough inspection, helping your vinyl sound better with each play.
Stay Organized and Save Time with Simple Lighting and Inspection Habits
Adopting a simple, repeatable lighting and inspection routine saves hours over the life of a collection. Grouping records for back-to-back inspection cuts down setup time and keeps cleaning materials handy.
- Stack uninspected records with separator cards, tagging each with inspection date and brief notes. This avoids repeats and ensures you don’t miss problem records.
- Keep magnifiers, brushes, and cleaning cloths within arm’s reach of your lighting setup so each record passes through all checkpoints before storage.
- Photograph records under inspection lighting before and after cleaning. File these for quick reference when buying, selling, or tracking long-term condition changes.
- Rotate lighting types by session to become better at spotting hard-to-see flaws. This variety prevents mistakes caused by relying on a single light every time.
- Update a quick checklist for each session, noting what worked, what missed, and which step to try next. Efficiency compounds as you build these micro-habits into your workflow.
Staying organized ensures your collection remains play-ready, valuable, and satisfying to revisit, even after years in storage or a big buying spree.
Spot Check Your Vinyl Collection for Long-Term Protection
Spot checks using vinyl inspection lighting prevent minor problems from turning into unfixable damage. Regular lighting-based checks make new arrivals and old favorites equally safe and enjoyable to spin.
Focusing attention on real-world handling: a quick scan before every play, a deep inspection during cleaning, and occasional full inventory reviews. Lighting reveals changes over time that are too easy to miss otherwise.
Small investments in high-quality lighting and thoughtful setups pay off in sound clarity, higher resale value, and pride in your collection. The next time you flip through your records, you’ll catch yourself reaching for that inspection light instinctively.