Few things mar listening pleasure like a dusty, grimy record. Steam cleaning vinyl has found its way into the conversation for collectors, promising deep cleaning without chemical residue. But it raises new questions for anyone who treasures their music.
While most people turn to brushes, cleaners, or even tap water, not all methods treat records equally. Steam cleaning, used properly, can lift embedded debris without physical abrasion. Get it wrong, and a prized album might warp or lose its groove entirely.
This article explores proven, expert-tested ways to use steam safely on vinyl. Read on for step-by-step advice, practical tips, and a clear-eyed look at different tools and pitfalls every record fan should know.
Choosing the Best Steam Tools Keeps Your Records Safe from Damage
Using steam to clean vinyl records starts with the right equipment. Not every home steamer or device is safe for use on grooved discs meant for music playback. Always check tool specifications and handle with care.
Selecting a professional-grade handheld steamer is like picking the right chef’s knife: precision, temperature control, and a gentle stream make all the difference. Avoid high-pressure or industrial steamers or anything with direct brush attachments.
Evaluating Steam Pressure and Temperature: Avoiding Risk
Use low steam pressure, mimicking the gentleness of a misty shower rather than a blast from a pressure washer. High pressure risks pushing debris deeper or damaging the grooves’ delicate shape. Choose a “delicate” or “low” setting on your device.
Keep water temperature just below boiling, around 200°F (93°C). If the steam feels scalding to your hand at six inches, it’s likely too hot for vinyl. Pretend you’re testing formula for a child: it should feel warm, never burning.
Never use boiling water directly on records, and avoid exposing any record to steam for more than a few seconds at a time. This limits potential heat warping and dulling of the grooves.
Why Nozzle Design Matters When Cleaning Records
A precision nozzle with a focused tip lets you target trouble spots—think of using a pencil rather than a paintbrush. This avoids flooding the entire surface and lets you steer clear of the label area.
Wide or blunt nozzles disperse steam too broadly, risking label damage or seepage down the spindle hole. Pick equipment with a narrow mouthpiece and a removable water tank for frequent refills.
Look for clear nozzle markings, control switches, or visual guides as found on quality electronic tools. They help ensure consistent steam and prevent accidental overheating or splattering.
| Device Type | Pressure Level | Nozzle Type | Best Use Scenario |
|---|---|---|---|
| Handheld Steamer | Low-Medium | Precision, Small Tip | Spot cleaning record grooves |
| Garment Steamer | Medium | Wide Mouth | Not recommended for vinyl |
| Steam Mop | High | Flat Pad | Never use on records |
| Professional Record Steamer | Low | Ultra-Narrow | Full record deep clean |
| DIY Retro-Fit Nozzle | Variable | Adapted/Pencil Tip | Precision clean, testing required |
Steam vs. Other Cleaning Methods: Comparing Outcomes
Steam cleaning vinyl works well for deeply embedded grit without physical wear. Compare to brushes that cause micro-scratches or liquid cleaners that leave a residue. Steam leaves surfaces residue-free if handled right.
Always pretest the process on non-collectible LPs. Use light, short bursts—never soak or saturate. Check for audible improvement by playing before and after cleaning sessions.
While other methods suit rapid dusting, steam is best reserved for restoring records with stubborn buildup, especially when traditional methods underperform. Record collectors sometimes call this their “last resort” tactic before considering re-purchase or disposal.
Essential Prep Steps Prevent Accidents or Record Damage Every Time
Never apply steam to a record that still has visible debris or dry, caked-on grime. First, clean surface dust with an anti-static brush or microfiber cloth. Work in a well-lit room with temperature and humidity under control.
Place your record on a flat, non-slip surface. Use a felt mat or record cleaning station for grip and support. Protect your label with a waterproof disc or adhesive round—it stops steam from ruining the printed area.
Check Record Condition Before Cleaning
Inspect for cracks, chips, or warping before cleaning. Vinyl suffering from heat damage or structural flaws shouldn’t meet steam at all—it risks worsening the defect. Rub fingers gently across both sides to spot uneven bumps.
- Scan under bright light to reveal deep scratches that steam cleaning can’t solve—shelve these for a different project.
- Breathe lightly on the record. If you see instant clouding, it could mean surface oil is present—wipe gently with alcohol before steaming.
- Never steam 78rpm shellac or acetate records, as these materials are far more heat-sensitive than modern vinyl.
- Look for sticky tape residue or marker. Remove with safe solvents before attempting any form of steam.
- Observe spindle hole cracks that could spread with the pressure of the process. Use gentle, minimal passes if cleaning these rare items.
Any anomaly means pause and reconsider. If in doubt, stick with dry brushing and reserve steam for robust, undamaged vinyl only.
Prepare Workspace and Tools Ahead of Time
Create a checklist: steam device, lint-free cloth, fresh water, and a protected surface. Gather all tools before starting so you’re never scrambling with a wet or hot item mid-clean.
- Fill steamer with distilled water only. Minerals in tap water can leave new spots or deposits that defeat the purpose.
- Have an absorbent, clean towel ready to blot any accidental spills or excess moisture.
- Keep your anti-static brush on hand for post-steam grooming, removing any loosened particles.
- Print or write out your procedure so you can follow each step precisely and avoid backtracking.
- Place records in paper sleeves away from the cleaning area. Don’t risk cross-contamination from airborne debris or pooled water.
Install a small fan to maintain airflow, preventing humidity buildup during lengthy cleaning sessions. It makes the area more comfortable and avoids excessive exposure of your vinyl to moisture.
Proper Technique Guarantees the Best Cleaning Without Surface Changes
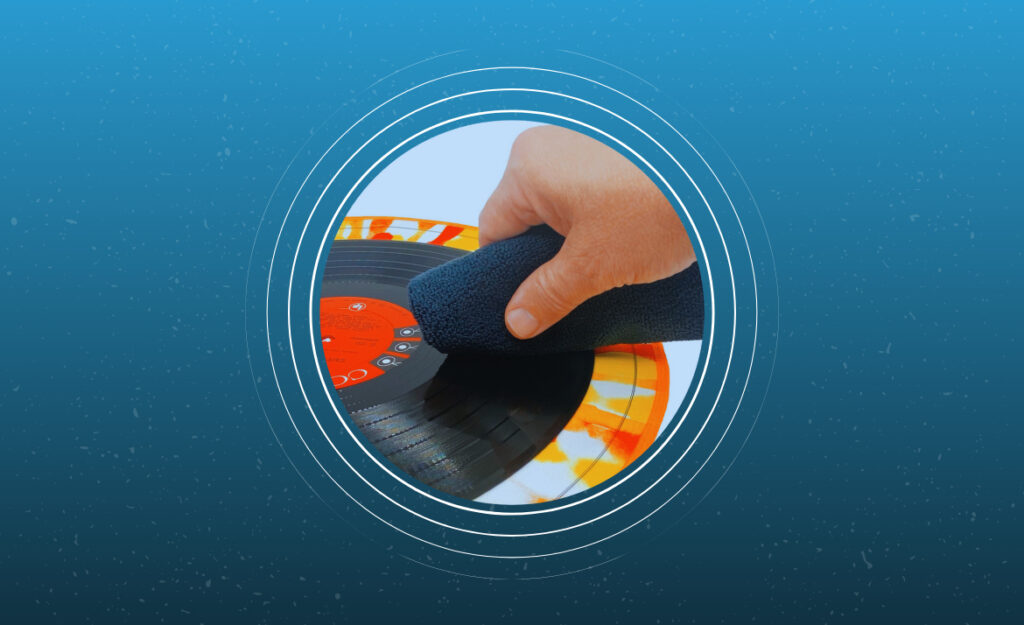
Direct your steam at a 45-degree angle—never face-on—to reduce heat intensity. Work around the disc in small, even arcs, keeping the nozzle at least two inches from the vinyl at all times.
Moisture should bead and evaporate in seconds. If water sits, your nozzle is too close or steam flow is too heavy. Slow, steady motion is your friend.
Small Area Steaming: Tackle Tough Grime Spot by Spot
First, target specific, stubborn marks rather than the whole record. Gently wave the steamer back and forth a couple of times—three seconds is usually enough.
Hold a lint-free cloth ready to immediately blot away any water drops that remain. If sticky residue persists, repeat with slightly longer bursts, but never exceed five seconds in one area.
Think of this as treating an ink stain on a favorite shirt: gentle, repeat dabbing works better than vigorous rubbing. The same principle protects your record surface.
Full-Disc Sweeping for Thorough Results
Once spot cleaning is complete, you can perform a controlled, one-pass sweep over the entire playing surface. Rotate the record slowly by hand or with a motorized spindle if you use a cleaning machine.
Keep the steam moving across the grooves continuously, never pausing in one place. Complete a full lap within ten seconds to avoid any hot spots.
Finish by resting the record upright in a drying rack. Allow at least 10 minutes of air exposure before returning it to a sleeve or playback setup.
Troubleshoot Common Mistakes to Extend Your Vinyl’s Longevity
Watch for warping, spotting, or cloudy residue as signs that your steam cleaning vinyl process needs tweaking. Addressing these problems quickly saves your collection from further damage or unnecessary repeat cleaning.
If a record feels sticky after steaming, rinse gently with distilled water and dry with a soft microfiber towel. Reassess your technique before moving to your next prized LP.
Warping Issues: Diagnosing and Correcting Heat Exposure
Visible waves or uneven surfaces mean the steam was too hot or held too close. Place the affected record between two heavy books, lined with parchment, and let it cool for 24 hours.
This won’t always restore perfect flatness, but it helps reduce minor curling. For collectible or sentimental pieces, always start your technique on less valuable records first.
If multiple records warp using one device, switch to a lower-temperature tool or use shorter bursts. Avoid steam altogether if heat damage recurs.
Residue and Cloudiness: Ensuring a Crystal-Clear Finish
Clouding or white residue after treatment often signals minerals from tap water or steam delivered too slowly. Switch to distilled water and keep the nozzle moving to avoid pooling.
If residue appears, re-wipe the surface with a dry microfiber cloth, rotating in the direction of the groove. Only use chemical cleaners if you know they’re safe for vinyl and non-abrasive.
Always inspect under direct lamp light before storing the record again. A clear, mirror-like shine means your technique is dialed in perfectly.
Post-Steam Care Routines Shield Your Records from Future Issues
Immediate aftercare is crucial to keep steam cleaning vinyl from introducing new risks. Even small amounts of leftover moisture can promote mold growth or attract dust if ignored.
Store each cleaned record upright and sleeve it only when bone dry. Resist the temptation to play a freshly steamed album until you’re certain it has dried completely—feels cool and leaves no trace on a dry palm.
Restoring Static Balance After Wet Cleaning
Steam can create static electricity if evaporation happens too fast or the surface isn’t dried evenly. Sweep the entire surface with an anti-static record brush before and after storage.
For serious audiophiles, use a carbon fiber brush or invest in a grounding mat. This step minimizes snaps and pops that static introduces back at the turntable.
Finally, track humidity in your storage area. Aim for 45–55 percent—enough to deter static but dry enough to avoid warping or mold in your collection.
Sleeving and Label Care Matters Most
Never return a half-dry record to its original paper sleeve. Always opt for high-density polyethylene inner sleeves for airflow and dust resistance.
Keep records labeled outward, away from the seam. Properly stored sleeves act as a physical barrier against sleeve rash and minimize exposure to airborne grime.
If you spill water on a label, immediately blot—never rub—or air dry before sleeving. Torn or wet labels can permanently reduce collection value, even for records with pristine grooves.
Advanced Tips for Collectors: Building Long-Term Cleaning Skills
Experienced collectors use logbooks or sticky notes to track cleaning attempts per record. Include steam cleaning vinyl dates, outcomes, and any issues caused or fixed. This history prevents accidental repeat cleaning or patterns of warping.
Experiment with techniques on budget finds before trying them on high-value albums. Logs reveal your learning curve and help troubleshoot recurring errors in your regimen.
Mixing Steam with Other Methods for Stubborn Grime
Some debris just won’t lift, even with steam alone. Pair short steam bursts with enzymatic cleaners for mold or sticky residue—treat with fluid first, then lift with steam.
If you combine methods, always rinse with distilled water last to prevent solvent buildup. Never mix cleaning fluids, as chemical reactions can harm vinyl. Keep wads of soft cloth ready for each step.
Let each step dry naturally between passes. Physical patience translates to preservation—one method at a time yields better long-term results.
Building Safe Habits Through Observation and Routine
Set a schedule to inspect your records once a season or before and after heavy use. Make routine maintenance part of your listening ritual so problems never reach emergency status.
Use a checklist for each session: inventory, inspect, steam, dry, sleeve, log. Consistency keeps each record in peak condition and preserves your music’s value for future generations.
Share learning with fellow collectors—slide technique tips into conversations or forums. This communal approach keeps everyone’s collections safer and strengthens best practices across the hobby.
Clean Sound, Lasting Value: Secure Your Vinyl with Smart Steam Care
Relying on steam cleaning vinyl when handled correctly allows collectors to maintain both sound quality and monetary value. This approach compliments traditional tactics where brushes and fluids fall short, restoring records that have seen decades of heavy play or poor storage.
Vinyl’s staying power in music culture depends on the thoughtful care collectors put into maintenance routines. Steam adds a safe, high-tech edge to the toolkit—if deployed with caution, patience, and a dose of real-world experience.
Anyone equipped with the right tools, habits, and wisdom can keep their favorite LPs spinning smoothly for years. Proper knowledge translates into clearer sound, preserved labels, and the rewarding feeling of reviving great music—one record at a time.